RLS (Row-level Security)
Let a member explore data while seeing only the rows your rules allow.
Row-level Security (RLS) lets a member explore your data and dashboards while only ever seeing the rows they're permitted to see. Two members can run the exact same query and get different results, because Draxlr transparently applies each member's row rules to every query, dashboard, and alert.
Typical uses:
- Multi-tenant SaaS — each customer sees only their own tenant's rows.
- Regional teams — a manager sees only their region's records.
- Client portals — an external client sees only the data tied to their account.
How it works
RLS is built from three pieces — a Permission, one or more Groups, and the Members in each group:
Permission (which tables + row rules, across every database) → Group (attaches the permission, sets attribute values) → Member (inherits the group's scope)
- Permission — a reusable, organization-wide rule set. It covers all of your databases: for each database you choose which tables are accessible and add row-level filters to those tables. One permission can be attached to many groups.
- Group — attaches a single permission and fills in its attribute values. The group also decides whether its members can see the saved queries and dashboards created by admins, and holds the list of members.
- Member — a user placed in an RLS group. Draxlr applies the group's permission and attribute values to every query the member runs.
Permission vs. Group:
A Permission defines what is restricted (tables and row rules) and is shared across groups. A Group attaches one permission, supplies the per-group attribute values, toggles access to admins' existing resources, and contains the members. Build the permission once, then reuse it across as many groups as you need.
Attributes: group and member level:
Attribute values can be set on the group (a shared default for everyone in it) and on an individual member. When the same attribute key is set in both places, the member's value wins. This lets one group serve many members who each see a different slice of data — set the common value on the group, and override it only for the members who differ.
Step 1 — Create a Permission
A permission is where you restrict tables and define row-level rules. It applies across every database in your organization.
Open Permissions
Go to Permissions and click New Permission. Give it a descriptive name (for example, Tenant-scoped access).
Pick a database
The left sidebar lists every database in your organization. Select a database to configure its tables. You can set rules on more than one database within the same permission.
Choose which tables are accessible
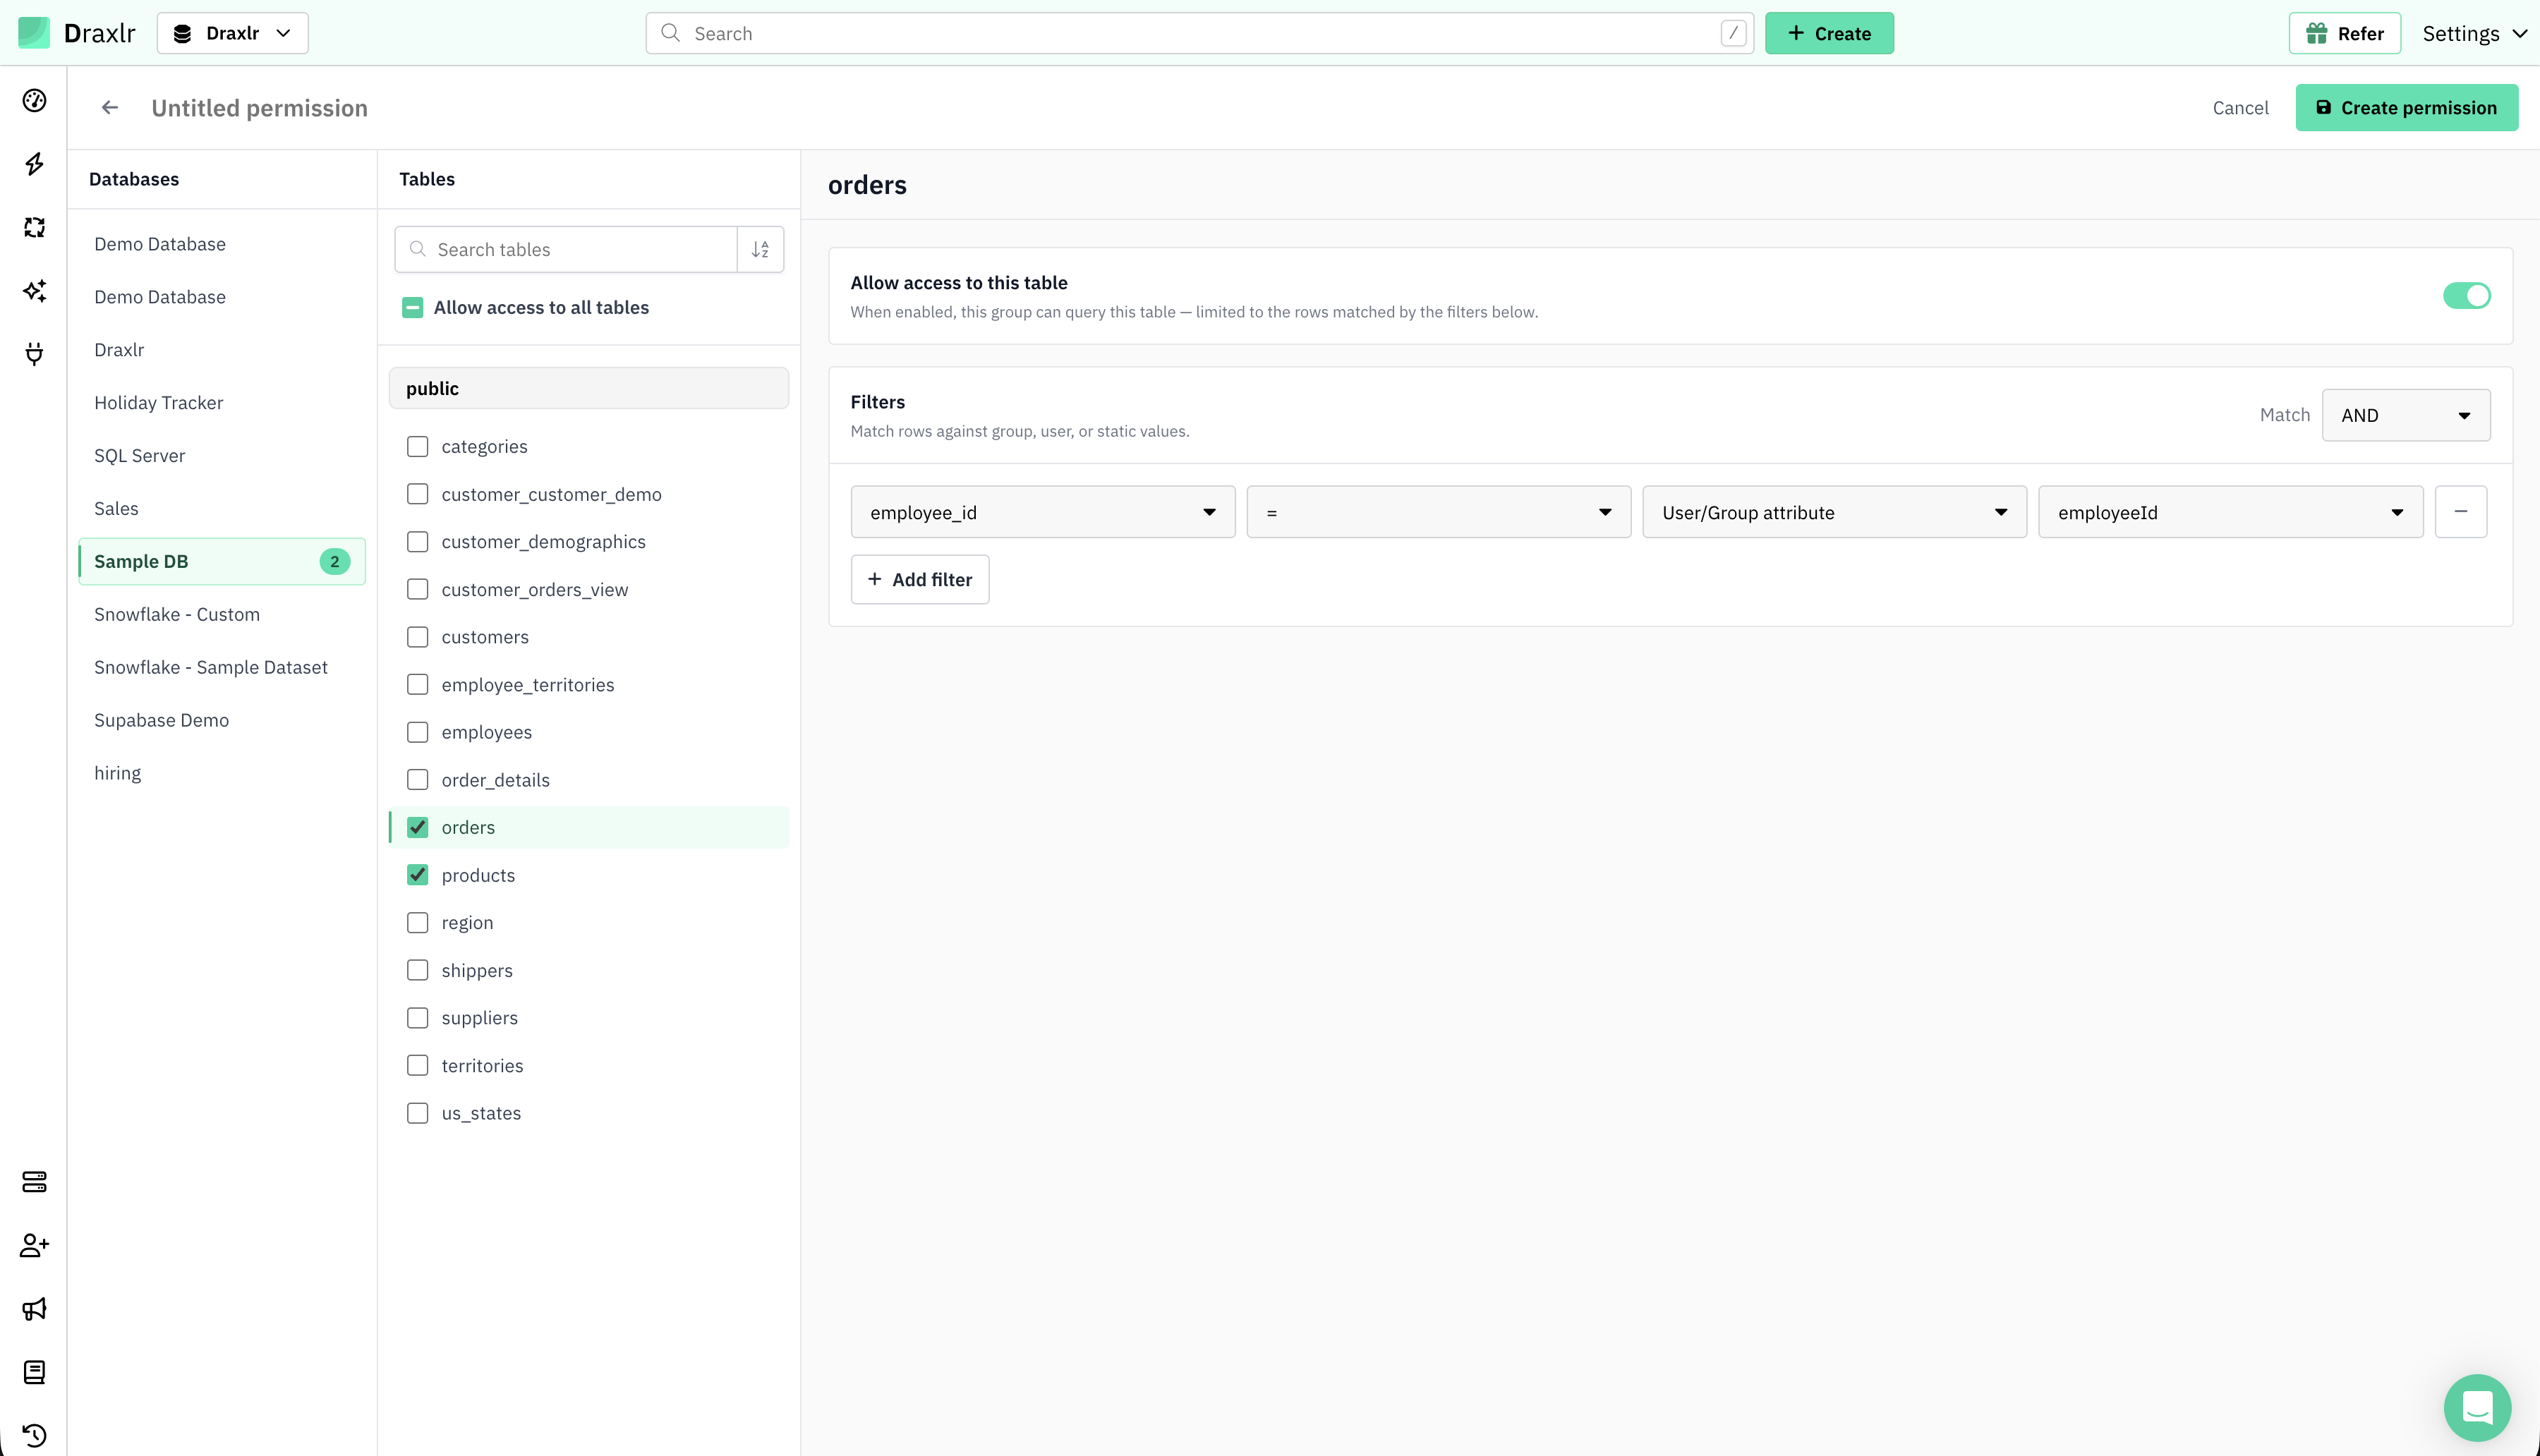
For each table the permission should expose, turn on Allow access to this table. To grant every table in the database at once, use Allow access to all tables.
Members can only query tables that are enabled here. Leave tables members shouldn't see disabled.
Add row-level filters to a table
Open an enabled table and add one or more Filters. When a table has multiple filters, choose whether they combine with AND or OR. Each filter has:
- Field — the column to match on (for example,
tenant_id). - Operator — how to compare (for example, equals or in).
- Value source — where the value comes from:
- Static value — a fixed value applied to everyone using this permission.
- Attribute — a named placeholder (for example,
tenant_id) that each group or member fills with its own value.
Save the permission
Click Create Permission (or Update Permission when editing). The permission is now available to attach to any RLS group.
Enabled tables without filters:
A table that is enabled but has no filters is fully visible (all rows) to anyone using the permission. Add at least one filter to every sensitive table, and leave tables members shouldn't see disabled.
Example
To scope members to a single tenant, on the orders table add:
Field
tenant_idOperatorequalsValue sourceAttribute → tenant_id
Every group or member that uses this permission will then only see orders rows where tenant_id matches the value you give them in the next steps.
Where attributes come from:
The attribute keys you can fill on a group or member are exactly the ones referenced by the permission's filters. If no filter uses an Attribute value source, there are no attributes to fill.
Step 2 — Create an RLS Group
A group attaches a permission and provides the attribute values that fill its placeholders.
Open the Groups tab
Go to Organization → Team, switch to the Groups tab, and click New Group.
Name the group and choose the RLS type
Give it a name and set the Access Type to RLS (Row-level Security).
Access type is fixed:
A group's access type (RLS or Dashboard) is set when it's created and can't be changed later.
Select the permission
Under Permission, choose the permission you created in Step 1. You can also create one without leaving the flow. A single permission can back many groups, so teams that need the same table and row rules can share one.
Decide access to admins' saved queries & dashboards
Use the Access admin's saved queries & dashboards toggle to control whether this group can view the saved queries and dashboards created by admins. When it's off, members only work with their own queries and dashboards. Either way, everything the group sees is scoped to their permitted rows.
Fill the group's attributes
Under Attributes, add a value for each attribute your permission's filters reference. For each one, pick the key (for example, tenant_id), its data type, and the value for this group (for example, 42).
These are the group's shared defaults — every member of the group uses them unless you override the value on an individual member (see Step 3).
Add users and save
Select the existing organization members who belong to this group, then click Create Group.
Step 3 — Add a member and set their attributes
You can assign members from the group in Step 2, or set RLS access directly on a member from the Users tab.
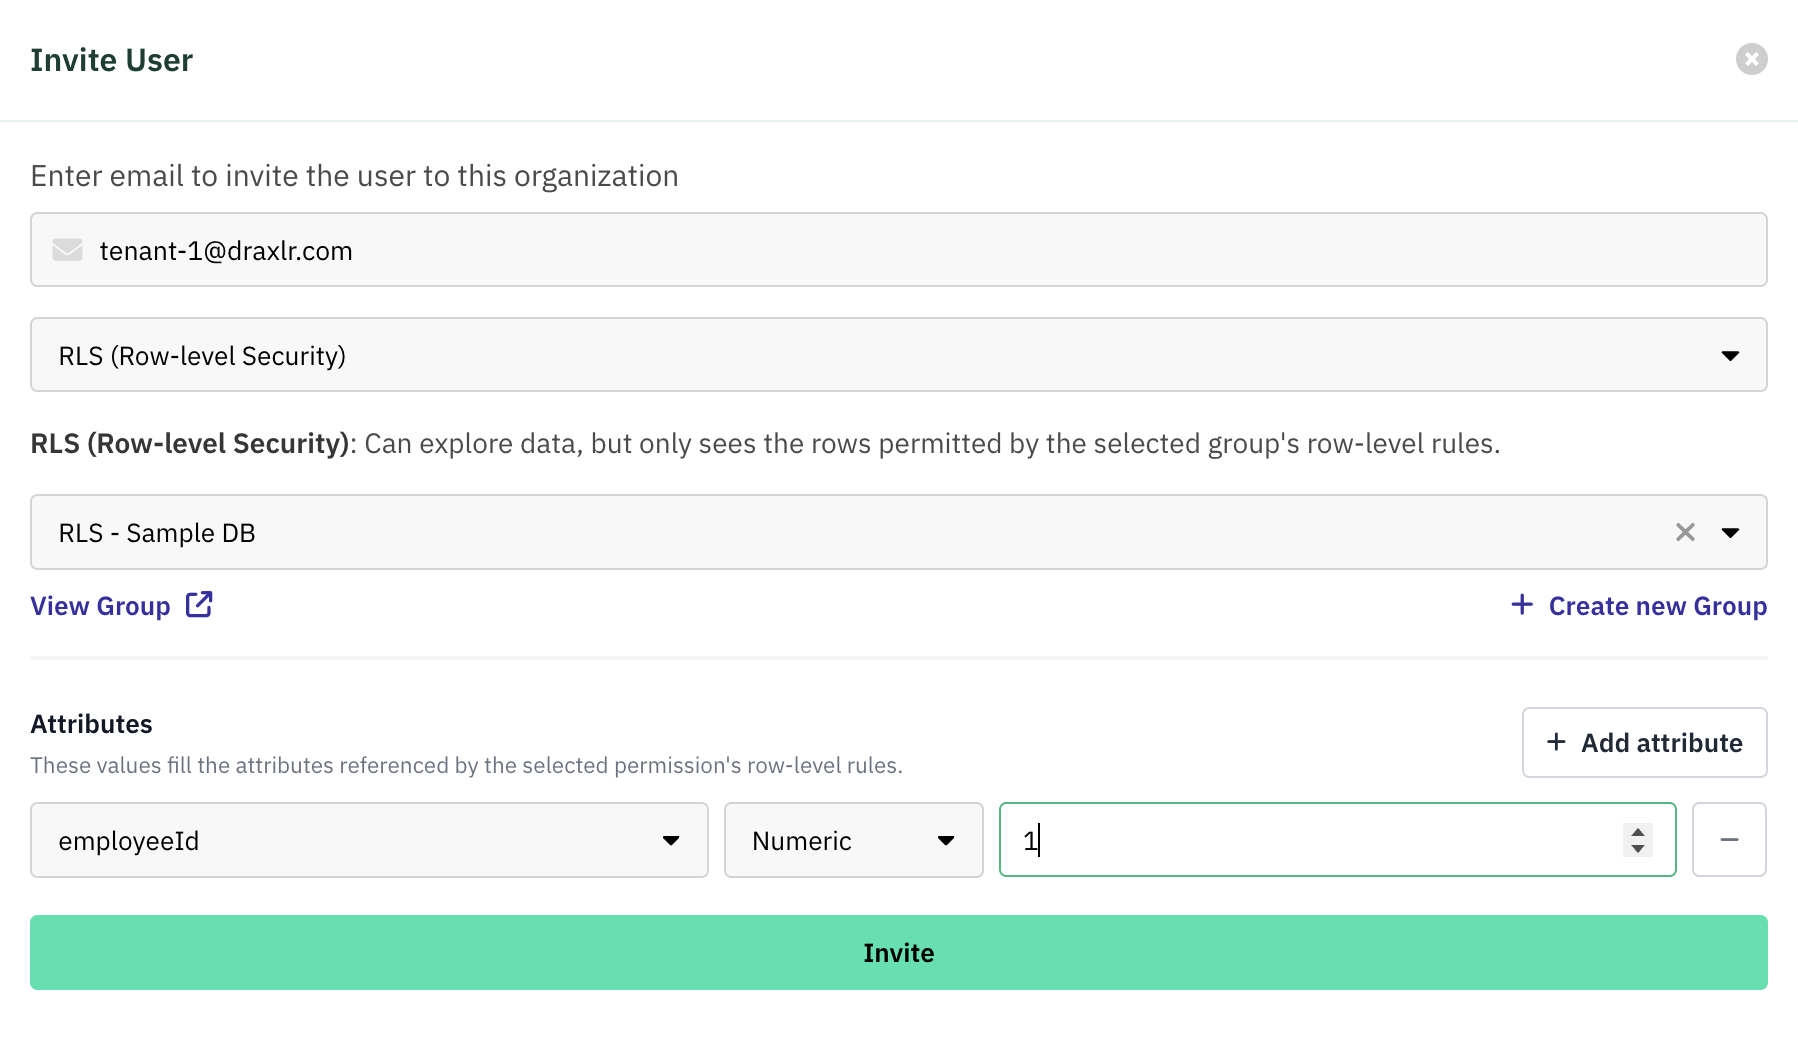
Invite or edit a member
On the Users tab, click Invite, or the Edit Access (pencil) action on an existing member.
Choose RLS access and a group
Set the Access dropdown to RLS (Row-level Security), then select the RLS group you created in Step 2 (or click Create new Group to build one without leaving the flow).
Fill the member's attributes
Under Attributes, set the per-member values that fill the permission's placeholders — for example tenant_id = 42 for this member. Set the key (matching the attribute name used in the permission's filters), its data type, and the value for this member.
An attribute set here is specific to this member and takes precedence over the group's value for the same key. Leave a member's attribute unset to fall back to the group's shared default.
Send the invite
Click Update (or Invite). Once the member accepts and signs in, every query, dashboard, and alert they see is filtered by their attribute values.
Attribute keys must match the filters:
A member only gets scoped correctly if the attribute keys match the attribute names used in the permission's filters. If a filter references tenant_id but the member (or their group) has no tenant_id value, that member's rows may not resolve as intended — always double-check the keys.
What an RLS member experiences
- Can Explore and run queries on the tables the permission allows — but results only ever include their permitted rows.
- Has their own dashboards and saved queries that they can fully create, edit, and delete — every element automatically scoped to their rows.
- Can also view the saved queries and dashboards created by admins only if their group's Access admin's saved queries & dashboards toggle is on — scoped to their rows, and they can't edit those.
- Receives email alerts and PDF/dashboard exports rendered with their own row scope — each member's report reflects only their data.
- Cannot manage databases, members, or billing.
Scoping is automatic and everywhere:
You don't have to remember to filter anything. Once a member is in an RLS group, Draxlr applies their rules to every path that returns data — Explore, dashboards, drill-downs, exports, and scheduled alerts.
Tips
- Reuse permissions. Build the table and row rules once in a permission, then attach it to as many groups as you need. You can't delete a permission while a group still uses it.
- Prefer attributes over static values. Use an Attribute value source whenever members should see different slices — you build the filter once and vary only the attribute value per group or member.
- Test as you build. Create a test member with representative attribute values and confirm they see the expected rows before rolling access out widely.
- Keep unused tables disabled. Only enable the tables a permission genuinely needs; a disabled table is never queryable.